VS Code HTML Shorthand (Emmet) — Complete Guide with Tips
Master VS Code Emmet abbreviations to write HTML 10x faster. Learn shorthand syntax, cheat sheet, and pro tips for HTML boilerplate, nesting, classes, IDs, and more.
2026-09-11 · 9 min read
HTML & Web Development Complete Tutorial Series & Course List
Master HTML5 tags, forms, tables, dropdowns, lists, Google Fonts, VS Code tools, and web development fundamentals step-by-step with 11 complete tutorials.
VS Code HTML Shorthand with Emmet — Write HTML 10× Faster!
Hello friend! Did you know that VS Code has a built-in superpower called Emmet? It lets you type a short abbreviation and press Tab (or Enter) to instantly expand it into full HTML code. No extra extension needed!
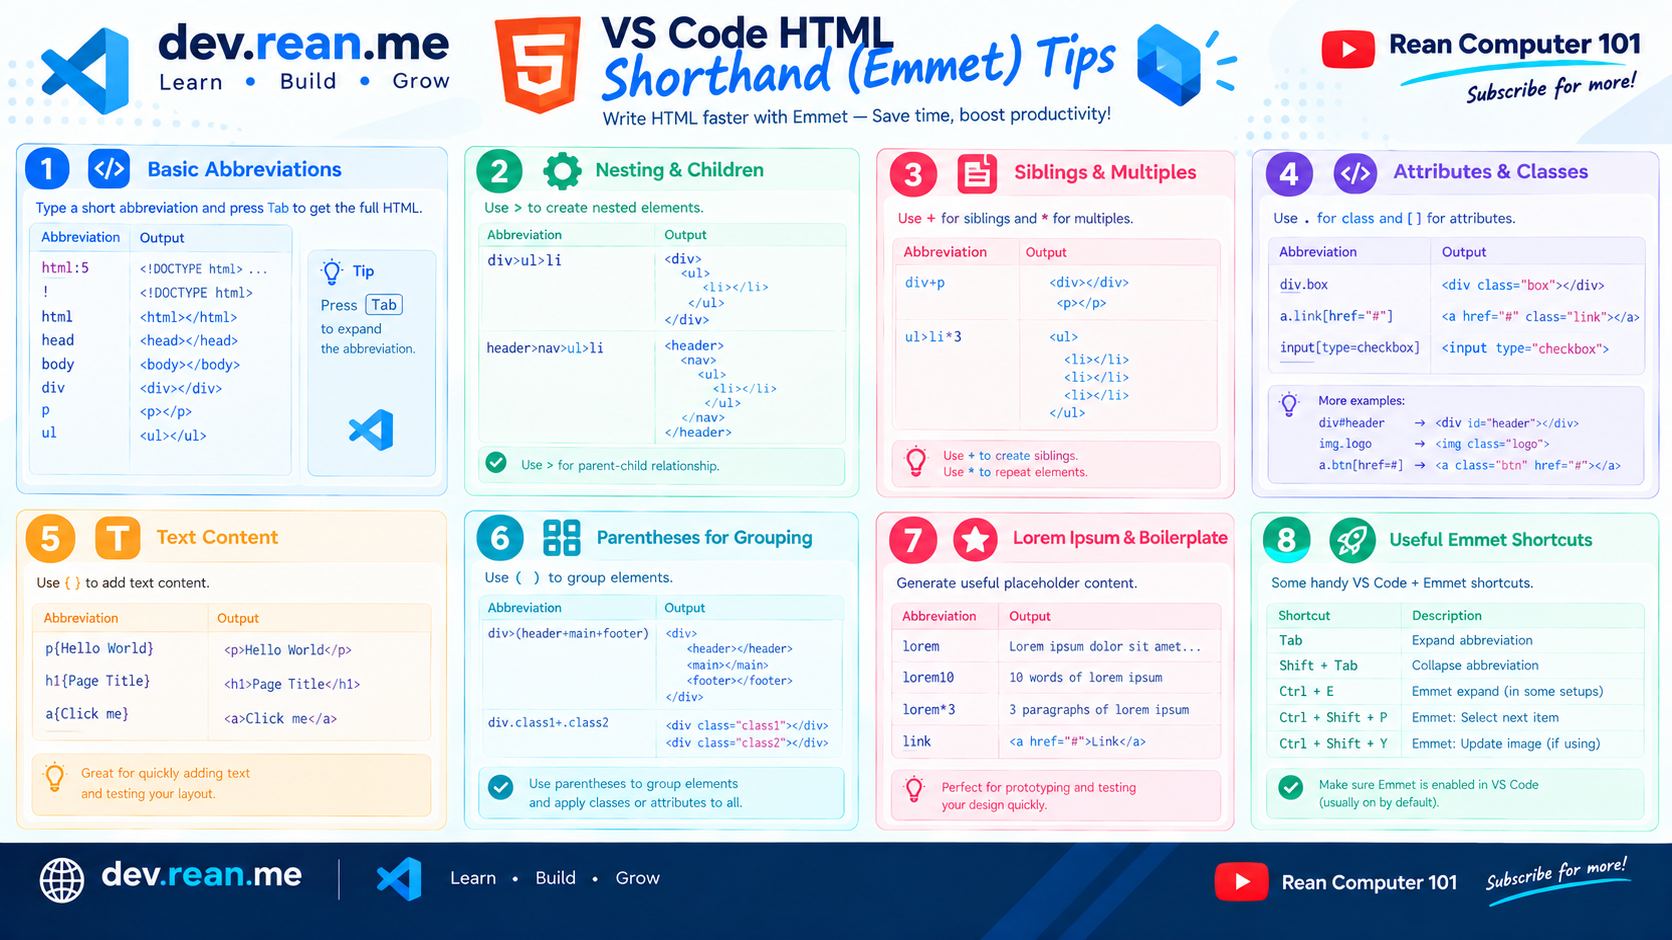 Download 2K Quality in link in the bottom.
In this guide, we cover all the essential Emmet shortcuts and pro tips to speed up your HTML workflow.
💡 Emmet is already built into VS Code — you do not need to install anything extra!
If you want to learn more about HTML tools:
What is Emmet?
Emmet is a shorthand syntax built into VS Code. You type a short code (abbreviation), press Tab, and VS Code automatically expands it into real HTML markup.
It works in .html, .jsx, .tsx, .vue, .php, and many other file types!
1. HTML Boilerplate — !
The most famous shorthand! Type ! and press Tab to generate a complete HTML5 starter template.
Type this:
!
Expands to:
<!DOCTYPE html>
<html lang="en">
<head>
  <meta charset="UTF-8">
  <meta name="viewport" content="width=device-width, initial-scale=1.0">
  <title>Document</title>
</head>
<body>

</body>
</html>
💡 Tip: This is the fastest way to start any new HTML file. Just open a blank
.htmlfile, type!, pressTab, and you're ready to code!
2. Simple Tag — tagname
Type any HTML tag name and press Tab to create the opening and closing tags with your cursor placed inside.
| Shorthand | Output |
|---|---|
div | <div></div> |
p | <p></p> |
h1 | <h1></h1> |
span | <span></span> |
section | <section></section> |
nav | <nav></nav> |
ul | <ul></ul> |
button | <button></button> |
3. Add Class — .classname
Use a dot (.) to add a CSS class. Default element is div.
Examples:
| Shorthand | Output |
|---|---|
.container | <div class="container"></div> |
.card.shadow | <div class="card shadow"></div> |
p.intro | <p class="intro"></p> |
h2.title.bold | <h2 class="title bold"></h2> |
button.btn.btn-primary | <button class="btn btn-primary"></button> |
💡 Tip: Chain multiple classes with dots:
div.card.flex.center→<div class="card flex center"></div>
4. Add ID — #idname
Use a hash (#) to add an HTML id attribute.
Examples:
| Shorthand | Output |
|---|---|
#app | <div id="app"></div> |
div#main | <div id="main"></div> |
form#login-form | <form id="login-form"></form> |
input#username | <input id="username"> |
💡 Tip: Combine class and ID in one shorthand:
div#header.navbar→<div id="header" class="navbar"></div>
5. Add Attributes — [attr]
Use square brackets [] to add any custom HTML attribute.
Examples:
| Shorthand | Output |
|---|---|
a[href="#"] | <a href="#"></a> |
input[type="email"] | <input type="email"> |
img[src="" alt=""] | <img src="" alt=""> |
button[type="submit"] | <button type="submit"></button> |
a[href="https://google.com" target="_blank"] | <a href="https://google.com" target="_blank"></a> |
6. Add Text Content — {text}
Use curly braces {} to add inner text content inside a tag.
Examples:
| Shorthand | Output |
|---|---|
h1{Hello World} | <h1>Hello World</h1> |
p{This is a paragraph} | <p>This is a paragraph</p> |
button{Click Me} | <button>Click Me</button> |
a[href="#"]{Read More} | <a href="#">Read More</a> |
li{Item} | <li>Item</li> |
7. Child Element — > (Child Operator)
Use > to nest elements inside each other (parent > child).
Examples:
| Shorthand | Output |
|---|---|
ul>li | <ul><li></li></ul> |
nav>ul>li>a | <nav><ul><li><a href=""></a></li></ul></nav> |
div>h2+p | <div><h2></h2><p></p></div> |
form>label+input | <form><label></label><input></form> |
8. Sibling Element — + (Sibling Operator)
Use + to create elements side by side at the same level.
Examples:
| Shorthand | Output |
|---|---|
h1+p | <h1></h1><p></p> |
label+input | <label></label><input> |
header+main+footer | <header></header><main></main><footer></footer> |
input+button | <input><button></button> |
9. Climb Up — ^ (Parent Operator)
Use ^ to go back up one level to the parent element.
Example:
Shorthand:
div>p>span^h2
Expands to:
<div>
  <p><span></span></p>
  <h2></h2>
</div>
💡 Tip:
^^climbs up two levels. Useful when building complex nested structures!
10. Multiply — *N (Repeat)
Use * followed by a number to repeat elements multiple times.
Examples:
| Shorthand | Output |
|---|---|
li*3 | <li></li><li></li><li></li> |
tr*4>td*3 | 4 table rows each with 3 cells |
div.card*5 | 5 <div class="card"> elements |
ul>li*5>a | <ul> with 5 <li><a> items |
Full example:
Shorthand:
ul>li*4>a[href="#"]{Menu Item}
Expands to:
<ul>
  <li><a href="#">Menu Item</a></li>
  <li><a href="#">Menu Item</a></li>
  <li><a href="#">Menu Item</a></li>
  <li><a href="#">Menu Item</a></li>
</ul>
11. Numbering — $ (Auto Counter)
Use $ inside text or attributes to automatically number repeated elements.
Shorthand:
ul>li.item-$*5{Item $}
Expands to:
<ul>
  <li class="item-1">Item 1</li>
  <li class="item-2">Item 2</li>
  <li class="item-3">Item 3</li>
  <li class="item-4">Item 4</li>
  <li class="item-5">Item 5</li>
</ul>
💡 Tip: Use
$$for two-digit numbering like01, 02, 03...
12. Group Elements — () (Grouping)
Use parentheses () to group complex structures and apply operators to the entire group.
Example:
Shorthand:
div>(header>nav>ul>li*3>a)+(main>section*2>p)+(footer>p)
Expands to:
<div>
  <header>
    <nav>
      <ul>
        <li><a href=""></a></li>
        <li><a href=""></a></li>
        <li><a href=""></a></li>
      </ul>
    </nav>
  </header>
  <main>
    <section><p></p></section>
    <section><p></p></section>
  </main>
  <footer><p></p></footer>
</div>
13. Common Emmet Shortcuts Cheat Sheet
Here is a quick reference for the most useful Emmet abbreviations:
Page Structure
| Shorthand | Description |
|---|---|
! | HTML5 boilerplate |
html:5 | HTML5 boilerplate (alternative) |
header+main+footer | Basic page layout |
nav>ul>li*5>a | Navigation menu with 5 links |
Forms
| Shorthand | Description |
|---|---|
form>input:text+input:email+input:submit | Simple form |
form>label+input[type="text"]+button{Submit} | Label + input + button |
input:checkbox+label | Checkbox with label |
select>option*4 | Dropdown with 4 options |
Content
| Shorthand | Description |
|---|---|
table>thead>tr>th*4^^tbody>tr*3>td*4 | Table with header + 3 rows |
ul>li*5{Item $} | Ordered list 5 items |
dl>dt{Term}+dd{Definition} | Description list |
figure>img+figcaption{Caption} | Image with caption |
Meta & Links
| Shorthand | Description |
|---|---|
link:css | <link rel="stylesheet" href="style.css"> |
script:src | <script src=""></script> |
meta:utf | <meta charset="UTF-8"> |
meta:vp | Viewport meta tag |
14. Pro Tips for Emmet in VS Code
Tip 1: Enable Emmet in JSX / TSX Files
Emmet doesn't work in .jsx and .tsx by default. Add this to your VS Code settings.json:
{
  "emmet.includeLanguages": {
    "javascript": "html",
    "javascriptreact": "html",
    "typescriptreact": "html",
    "vue-html": "html",
    "php": "html"
  }
}
Tip 2: Use Tab or Enter to Expand
By default, Emmet expands when you press Tab. You can also press Ctrl + E or use the Command Palette → "Emmet: Expand Abbreviation".
To always expand on Enter, add to settings.json:
{
  "emmet.triggerExpansionOnTab": true
}
Tip 3: Wrap Selection with Emmet
Select HTML text → Open Command Palette (Ctrl+Shift+P) → type "Emmet: Wrap with Abbreviation" → type your abbreviation. This wraps selected lines inside a new element!
Tip 4: Disable Emmet in Markdown
Emmet can interfere with Markdown writing. Disable it for specific file types:
{
  "emmet.excludeLanguages": ["markdown"]
}
Tip 5: Use Emmet with Multi-Cursor
Emmet also works with VS Code multi-cursor editing! Place multiple cursors (Alt+Click), type an abbreviation, and expand all at once.
15. Real-World Examples
Build a Card Component
Shorthand:
div.card>img[src="photo.jpg" alt="Photo"]+div.card-body>h3.card-title{Product Name}+p.card-text{Description here}+a.btn[href="#"]{Buy Now}
Result:
<div class="card">
  <img src="photo.jpg" alt="Photo">
  <div class="card-body">
    <h3 class="card-title">Product Name</h3>
    <p class="card-text">Description here</p>
    <a class="btn" href="#">Buy Now</a>
  </div>
</div>
Build a Login Form
Shorthand:
form#login-form>h2{Login}+div.form-group>label[for="email"]{Email}+input[type="email" id="email"]^^div.form-group>label[for="pass"]{Password}+input[type="password" id="pass"]^^button[type="submit"]{Sign In}
Result:
<form id="login-form">
  <h2>Login</h2>
  <div class="form-group">
    <label for="email">Email</label>
    <input type="email" id="email">
  </div>
  <div class="form-group">
    <label for="pass">Password</label>
    <input type="password" id="pass">
  </div>
  <button type="submit">Sign In</button>
</form>
Build a Table
Shorthand:
table>thead>tr>th*3{Col $}^^tbody>tr*3>td*3{Cell}
Result:
<table>
  <thead>
    <tr>
      <th>Col 1</th>
      <th>Col 2</th>
      <th>Col 3</th>
    </tr>
  </thead>
  <tbody>
    <tr>
      <td>Cell</td>
      <td>Cell</td>
      <td>Cell</td>
    </tr>
    <tr>
      <td>Cell</td>
      <td>Cell</td>
      <td>Cell</td>
    </tr>
    <tr>
      <td>Cell</td>
      <td>Cell</td>
      <td>Cell</td>
    </tr>
  </tbody>
</table>
Summary — Emmet Operator Quick Reference
| Operator | Symbol | Example | Meaning |
|---|---|---|---|
| Element | tag | div | Creates <div></div> |
| Class | . | .box | Adds class="box" |
| ID | # | #app | Adds id="app" |
| Attribute | [] | [type="text"] | Adds any attribute |
| Text | {} | {Hello} | Adds inner text |
| Child | > | div>p | Nests inside |
| Sibling | + | h1+p | Side by side |
| Climb Up | ^ | div>p^h2 | Goes up one level |
| Repeat | * | li*5 | Repeat 5 times |
| Counter | $ | item-$ | Auto-numbers (1, 2, 3…) |
| Grouping | () | (header+main) | Group for operators |
📥 Download Cheat Sheet Image
📥 Download 2K Quality Image Here
📚 Read More HTML Tutorials
Level up your HTML skills with more guides:
- ⚡ Essential VS Code Extensions for HTML
- 📋 HTML Complete Cheat Sheet
- 🏆 HTML Tips and Tricks with Examples
- 📊 How to Use Table Tag in HTML
- 🔽 Everything About Dropdown List in HTML
- 📝 Complete List of HTML Elements
- 🔤 How to Add Multiple Google Fonts in HTML
Happy coding! 🎉 Emmet will save you hours of typing every week!
HTML & Web Development Complete Tutorial Series & Course List
Master HTML5 tags, forms, tables, dropdowns, lists, Google Fonts, VS Code tools, and web development fundamentals step-by-step with 11 complete tutorials.